
How-to Guide: Manually Installing RetroPie: Navigating the RetroPie Setup Script Menu Structure

Following the June 8th 2016 update to the RetroPie Setup Script the functionality and menu structure have changed noticeably from the streamlined earlier incarnation.
Whilst the new (at time of writing) version 4.0 DEV allows far more control over the setup and maintenance of RetroPie, it necessarily appears a little more complex than before; in this guide I illustrate the revised layout.
Sections of this article expand upon my previous guide: Multipurpose Raspberry Pi: Installing a Media, Gaming, PC Replacement
Topics Covered
- Manually Installing RetroPie
- Obtaining and Installing the RetroPie Setup Script
- Running the RetroPie Setup Tool: Original Incarnation
- Running the RetroPie Setup Tool: Version 4.0 DEV
- Post-Installation
- Related Posts
Manually Installing RetroPie
Installation of RetroPie on an already extant Raspbian system is relatively straightforward. For guidance on installing and setting up Raspbian, please see Multipurpose Raspberry Pi: Installing a Media, Gaming, PC Replacement
First, after completing the steps listed, ensure that the Raspberry Pi has been rebooted.
Obtaining and Installing the RetroPie Setup Script
-
At the console, install support for accessing GitHub code repositories by typing the following command:
sudo apt-get install -y git dialog -
set the working directory by typing:
cd -
Download the RetroPie setup script by issuing the following command:
git clone --depth=1 https://github.com/RetroPie/RetroPie-Setup.git -
Change the working directory to the newly downloaded
RetroPie-Setupdirectory:
cd RetroPie-Setup -
Allow the setup script to be executed (run) by changing a file attribute:
chmod +x retropie_setup.sh
Running the RetroPie Setup Tool: Original Incarnation
For versions of RetroPie with an installation script predating the June 2016 version 4.0 DEV update, the script will launch a menu similar to that shown in the following image, and which offers ‘Binary-based installation (recommended)’ as the first option.
- To launch the RetroPie setup script, type:
sudo ./retropie_setup.sh
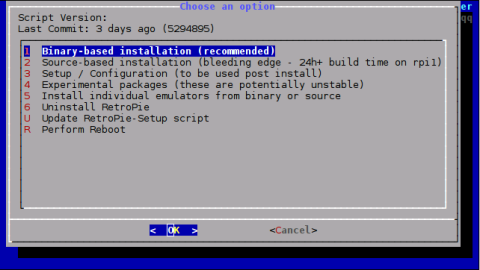
RetroPie Setup Tool -
Select the Binary-based installation (recommended) option, which will begin downloading and installing the components which comprise RetroPie.
This option had the benefit of simplicity, but is an all-or-nothing approach; it installs the RetroPie core functionality, and a huge range of emulators including those sharing the common RetroArch core, Ports of classic PC games including Doom, Quake, and Duke Nukem, and various standalone (non-Retroarch) systems, including the Atari ST Hatari emulator.
On a fast internet connection, with a Raspberry Pi 3, this option generally takes about 20 minutes in my experience.

Running the RetroPie Setup Tool: Version 4.0 DEV

The Version 4 RetroPie Setup Script (retropie_setup.sh) main menu contains the following options:
- Manage Packages
- Setup / Tools
- Uninstall RetroPie
- Update RetroPie-Setup script
- Perform Reboot
When performing an installation of RetroPie, we need only concern ourselves with the first menu option, Manage Packages.
-
Select the Manage Packages option to display the following sub-menu:
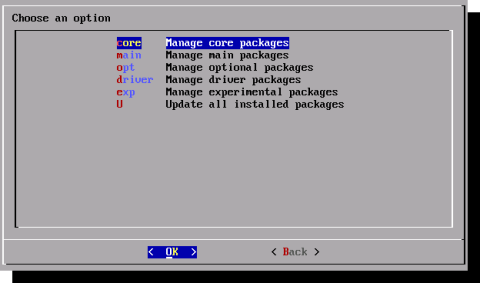
RetroPie Setup – Main Menu | Manage Packages Menu | Manage Core Packages option The Manage Packages menu entries are described as follows on the RetroPie wiki:
- Core: These are essential packages needed for RetroPie to run. Do not remove them.
- Main: These are the main emulators that come installed with the RetroPie SD image.
- Optional: These are optional packages that are working but aren’t included with the RetroPie SD image.
- Drivers: Here you install gamepad drivers like the PS3 or Xboxdrv.
- Experimental: These packages have not been fully tested and may have bugs.
- Update All Installed Packages: This is more or less equivalent to the former method of updating the full binary install.

Managing the RetroPie Core Packages
The Core Packages comprise the framework and user interface which are the foundations of RetroPie, and must be installed before any emulator can be run.
-
From the Manage Packages menu, select the Manage Core Packages option to display the following sub-menu:
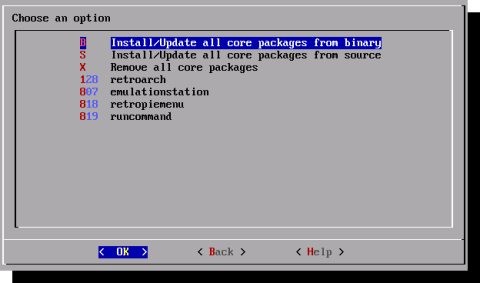
RetroPie Setup – Main Menu | Manage Packages Menu | Manage Core Packages Menu | Install Core Packages from Binary option -
Select ‘Install/Update all core packages from binary’ to install:
- RetroArch – the Libretro api shared by many of the emulators)
- Emulation Station – the graphical front-end from which emulators and their roms are launched
- RetroPie Menu – an Emulation Station menu to access and manipulate RetroPie settings
- RunCommand – a script which is used to launch emulators from Emulation Station
After a successful installation, the menu will display the above items suffixed (installed):
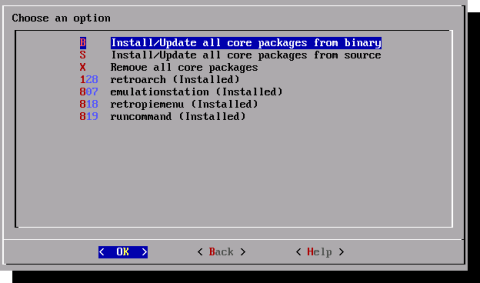
RetroPie Setup – Main Menu | Manage Packages Menu | Manage Core Packages Menu | Install Core Packages from Binary – Post Install For further details on Libretro and RetroArch, please see the What is RetroArch? section in the post RetroPie system overview – software and hardware components, and the related article: RetroPie Emulation: RetroArch, Libretro, and the Power of the Options Menu


Installing the Main Emulators
Once the RetroPie subsystem has been installed we can begin installing the emulators.
Classed as ‘Main Emulators’ are the majority of the Libretro-core systems, plus three popular non-Libretro emulators:
- mame4all – The Multi Arcade Machine Emulator
- mupen64plus – The Mupen N64 emulator – generally a much faster option than the Libretro variant
- pifba – Final Burn Alpha, supporting Mame roms for CPS1, CPS2, Neogeo, Toaplan, and other games
To install the Main Emulators, first return to the Manage Packages menu, then:
-
Select Manage Main Packages
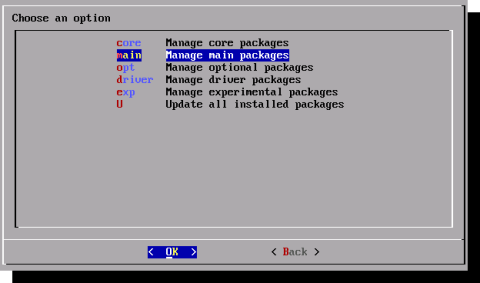
RetroPie Setup – Main Menu | Manage Packages Menu | Manage Main Packages option -
From the Manage Main Packages menu, select ‘Install/Update all main packages from binary’
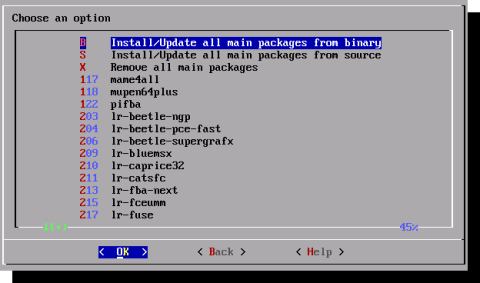
RetroPie Setup – Main Menu | Manage Packages Menu | Manage Main Packages Menu | Install Packages from Binary option Installation of the main emulator packages will now proceed; installation can take some considerable time, during which pages of text similar to the following will be displayed:
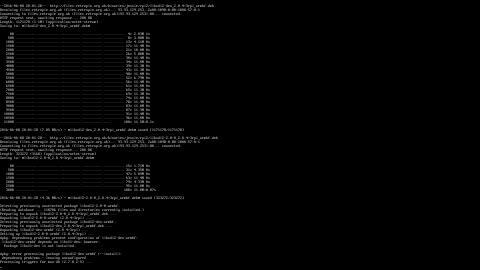
RetroPie Setup – Installation from Binary in Progress During installation the in-built power-saving feature may blank your monitor – press any key to restore the display (I tend to use
shiftas it’s less likely to interfere with anything).Following the installation, the Manage Main Packages menu will be updated, appending each emulator entry with the (installed) suffix.
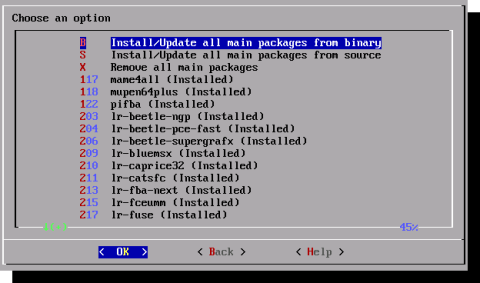
RetroPie Setup – Main Menu | Manage Packages Menu | Manage Main Packages Menu | Install Packages from Binary option (post-install)


Installing Optional Packages (Emulators and More)
Optional Packages include emulators, such as the Atari ST emulator Hatari, ports including PrBoom (Doom) and Quake, and non-emulator systems such as the Kodi Media Center.
To install any of the Optional Packages, first return to the Manage Packages menu, then:
-
Select Manage Optional Packages:
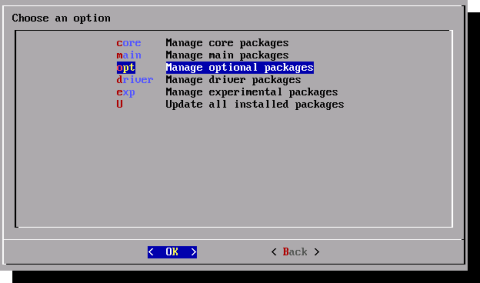
RetroPie Setup – Main Menu | Manage Optional Packages option -
Selecting any item from amongst the extensive list will perform the installation.
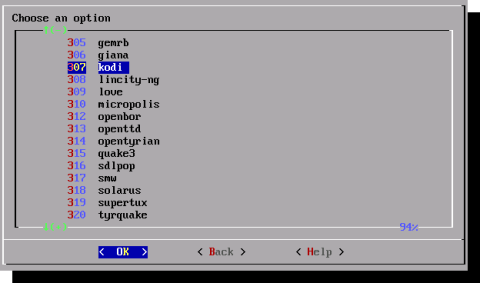
RetroPie Setup – Main Menu | Manage Optional Packages Menu | Kodi Install option Following installation the item’s entry will be suffixed with (installed).
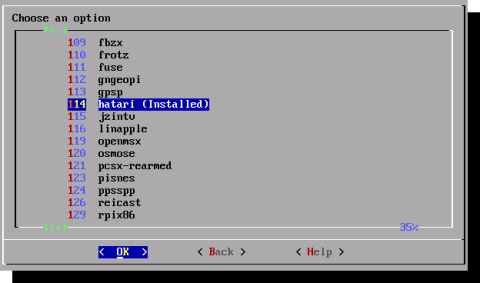
RetroPie Setup – Main Menu | Manage Optional Packages Menu | Hatari Install option


Installing Experimental Packages (Emulators and More)
The Experimental Packages menu includes items which are in beta, and as such may contain bugs.
Please note: in previous releases the Kodi media center was listed as experimental, but has since been moved into the Optional Packages menu.
To install any of the Optional Packages, first return to the Manage Packages menu, then:
-
Select Manage Experimental Packages:
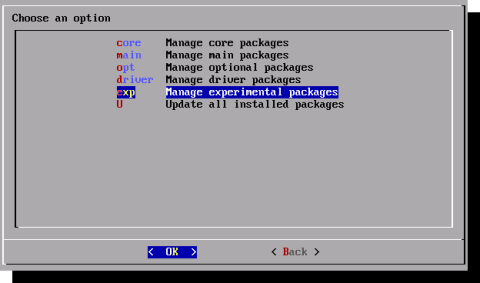
RetroPie Setup – Main Menu | Manage Experimental Packages option The system will display the Experimental Packages sub-menu; selecting an item from the list to perform the installation, after which the item will appear in the menu with the (installed) suffix.

Post-Installation
-
Once the installation completes, reboot the Raspberry Pi. Generally it’s never a good idea to simply switch the power off as the filesystem can become corrupted. To reboot cleanly from the command line:
sudo reboot
If you wish to shut down the Pi from the command line:
sudo shutdown -h now -
When the Pi has rebooted, to launch RetroPie, issue the following command:
emulationstation
(this is the name of the graphical user interface used by RetroPie)
A comprehensive first-time usage guide for RetroPie, including controller configuration, can be found here.
A Labour of Love
Retro Resolution is entirely a labour of love. Please consider offering a donation if the information here has helped illuminate, enlighten, or otherwise assisted you!

Related Posts
- Links: Raspberry Pi and Gaming Emulation via RetroPie
- Atari ST and STe Computing on the Raspberry Pi with RetroPie’s Hatari Emulator
- Multipurpose Raspberry Pi: Installing a Media, Gaming, PC Replacement
- Multipurpose Raspberry Pi – Part 2: Adding a Menu to Access RetroPie, Kodi, and the Raspbian Desktop
- Raspbian Linux Shell Commands and Tools – Part 1: Just the Basics
- Navigating the Raspberry Pi’s File System. Raspbian Linux Shell Commands and Tools – Part 2
Overclocking and Stability Testing the Raspberry Pi
- Part 1: Overclocking the Pi 2 – In Depth
- Overclocking the Raspberry Pi 3: Thermal Limits and Optimising for Single vs Multicore Performance
About
Disclaimers
Privacy Policy
Terms and Conditions
© Retro Resolution

I have installed the kodi addon for retropie and it works fine, but I cannot connect to it via sftp.
Is there a default username and password, as I cannot recall choosing one?
LikeLike
Thanks for detailed tutorial. I didn’t have any trouble following it.
LikeLike
I’m glad that it was useful for you
LikeLike
Superb !… Already got Retropie, even a scaled down model of the Atari St in which I can fit RPi… Thanx !
LikeLike
I think “install all experimental packages” was a mistake. It’s been 5 hours.
LikeLike
So much great info in one place to create a fantastic multi-purpose pi3
loved it!
LikeLike
Thank you so much for your kind and positive feedback, it is very much appreciated. Enjoy your Pi!
LikeLike
thank you! only one problem, whenever I try to open retropie on my pi3 model B it doesen’t work. does anybody know why this is happening?
LikeLike