More speed for free?

Overclocking and Stability Testing – Part 1
When using the Raspberry Pi 2 to run any sort of intensive software, which certainly includes emulating classic video games systems using RetroPie, you really need all the processing and graphical horsepower you can get. Luckily there’s more available under the bonnet of the Pi with a little tweaking.
Note: For additional considerations when overclocking the Raspberry Pi 3, please see Overclocking the Raspberry Pi 3: Thermal Limits and Optimising for Single vs Multicore Performance, in addition to the current post.
Topics Covered In Part 1
- Why Overclock?
- Raspberry Pi System Architecture
- Overclocking, Hardware Lifespan, and Your Raspberry Pi’s Warranty
- A Note On Overclocking and SD Card Stability
- Raspi-Config Overclock Options
- Editing Overclock Settings Within the Config.txt File
- Help! What To Do If The Pi No Longer Boots After Applying Overclock Changes
- Tested Overclock Values – Failures and Successes
Topics Covered In Parts 2, 3, and 4
- Stability Testing the Raspberry Pi
- MPrime – Multicore Testing
- MemTester – Single Core and Multicore Testing
- SD Card Stability Test Script
Disclaimer
Overclocking the Pi is supported by tools provided with standard operating system distributions, such as Raspbian, and sanctioned by the manufacturer (with some caveats, as discusssed below). That said, the following details only my own research and experiences with a single Raspberry Pi 2 device; as always, your mileage may vary.
Assistance for those new to Linux
Making changes to the Overclock settings on the Pi, and testing the changes for stability, requires a little knowledge of the Linux command shell.
Please see my related posts for a basic guide which should help those new to Linux and/or Raspbian get started:
- Don’t Fear The Command Line: Raspbian Linux Shell Commands and Tools – Part 1
- Navigating the Raspberry Pi’s File System. Raspbian Linux Shell Commands and Tools – Part 2
Overclocking and Power – Use a Quality PSU
When overclocking it is worth ensuring that your Pi is serviced by a good quality Power Supply Unit (PSU), as this is often a point of failure. Not all micro usb supplies, or cables, are up to the task.
Please see my earlier post covering this topic here.
Why Overclock?
The Raspberry Pi 2, as with the predecessor Pi, can be setup to run faster than the default system, effectively giving extra processing and graphical capabilities for free. For retro gaming this can be critical, and is especially true of the N64 emulators, as well as when running more demanding PlayStation releases such as Gran Turismo 2.
Raspberry Pi System Architecture
The Raspberry Pi 2 contains a System on a Chip (SoC), which integrates a quad-core ARM CPU and a Broadcom VideoCore IV Graphics processing unit (GPU), alongside 1GB of SDRAM memory.
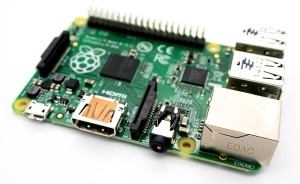
Unlike a traditional PC the Raspberry Pi does not have a conventional BIOS, instead utilising a configuration file which is read at boot-time through which multiple aspects of the system’s hardware can be altered.
The Raspbian distribution upon which RetroPie is built offers a menu-driven configuration tool which aims to allow easy overclocking, and includes a single option specifically for the Pi 2. However, there is a downside to this simplicity; along with various forum users I found that the values set by this option lead to an unstable system*. All is not lost, however; in my case a relatively small tweak to the RAM speed value was enough to gain solid stability with healthy overclocking (see below).
* This is true of the version of the tool contained in the RetroPie 2.6 distribution which all of these blog posts are based upon. Details of specific components are contained in this earlier blog post.
Overclocking, Hardware Lifespan, and Your Raspberry Pi’s Warranty
If you’re on the cautious side you may be concerned that overclocking your Pi will break the system, or at least void your warranty. There’s a lot of misinformation on forums regarding this, mainly because the situation regarding overclocking the Pi has changed since the original Raspberry system was released.
At the time of writing, the following statement clarifying the safety and impact upon the warranty of overclocking is available on the elinux.org site.
Setting parameters other than that available by ‘raspi-config’ will set a permanent bit within the SoC, making it possibly to detect that you Raspberry Pi has been overclocked. This was meant to void warranty if the device has been overclocked.
Since 19th of September 2012 you can overclock your Raspberry Pi without affecting your warranty (sic)
This statement is backed by a link to a blog maintained by www.raspberrypi.org which provides further details and reassurance. Rather than setting the Pi to permenantly run at overclocked speeds, a new Turbo Mode was introduced which:
…dynamically enables overclock and overvolt under the control of a cpufreq driver, without affecting your warranty. We are happy that the combination of only applying turbo when busy, and limiting turbo when the BCM2835’s internal temperature reaches 85°C, means there will be no measurable reduction in the lifetime of your Raspberry Pi.
A Note On Overclocking and SD Card Stability
In the early days (and years) of the Pi’s existence there were apparently a lot of issues whereby overclocked machines experienced corrupted SD card data. I spent a lot of time researching this situation, as a system which randomly destroys its own filesystem isn’t worth using; it appears however that these issues have been long resolved.
An idea of how much of an issue SD card corruption was, and the lengths people were going to to prevent it, can be found on this thread on IdeaHeap: Stopping SD Card Corruption on Raspberry Pi’s Raspbian
The official, definitive, information on this issue comes from elinux.org: SD Card Usage with Overclocking
Stability of SD card operations when using overclocking is independent of:
- Filesystem type, ext4, NTFS or other.
- SD card vendor.
- The Raspberry Pi model.
- SD card size – verified for 16 GB and up.
What does matter is when you under-power your Raspberry Pi (that is, less than the Raspberry Pi base setup specifications!).
There initially was an increased likelihood of SD card corruption when using overclocking. This is no longer an issue (with firmware from Nov 11 2013 or later).
Regarding the above warning not to under-power the system, please see my previous post Looking after your Pi – Part 1 – The Importance of a Quality Power Supply (PSU)
Raspi-Config Overclock Options
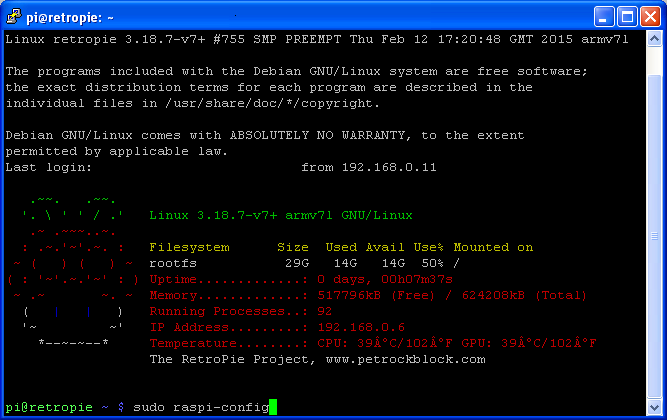
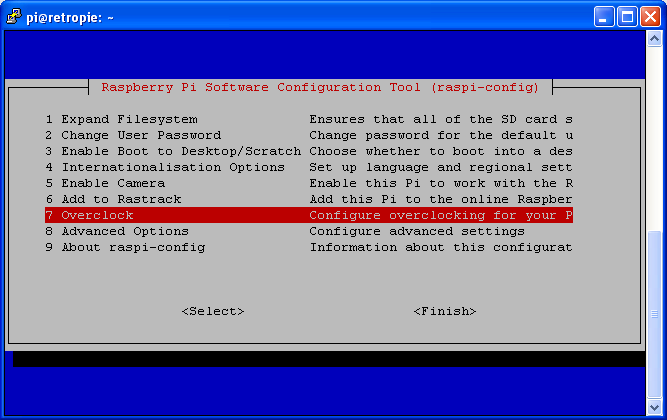
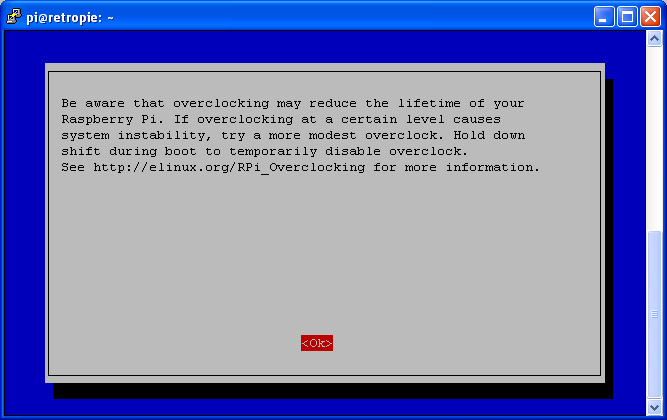
The following images show the use of the Raspbian command line to launch the Raspi-Config utility, and the selection of the Overclock option from that tool (click an image to view a larger version).
If using the RetroPie distribution, the command line / shell can be accessed by pressing F4 when using the Emulation Station front-end, or from that application’s shutdown menu. If using a standard Raspbian installation, the X-Windows / desktop shutdown menu should have an option to exit to a command line, or a shell can be launched directly on the desktop.
Launch the Raspi-Config utility via the command:
sudo raspi-config
Note: it is not necessary to provide a qualified path, nor to navigate to that file’s host folder.
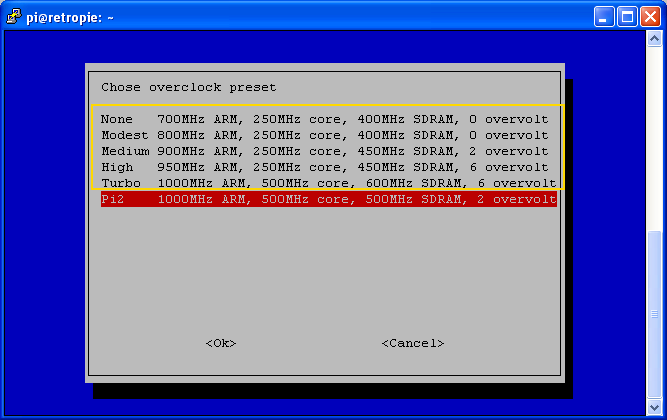
Select the Overclock option, heed the warning, then choose the ‘Pi2’ entry from the overclock selections provided.
In the fouth image, showing the available Overclock tool selections, the options suitable only for the Raspberry Pi 1 are shown bounded in yellow. The single entry for the Raspberry Pi 2 is highlighted in red.
On the system under test these values resulted in a Pi which was unable to pass any of the stability tests (which will be covered in the next blog post). The consensus on various forums is that the Pi 2 is not as overclockable as the Pi 1 – for example the newer quad-core CPU (ARM processor) tolerates a much lower range of overclock values than the single core processor. That isn’t to say that the gains to be had are not worth taking – increasing the main CPU, the system RAM, and the graphics processor speeds reap significant benefits when running intensive applications such as emulators.
When the Raspi-Config Overclock tool is used, behind the scenes the system simply adds or updates a few entries within the config.txt file:
The Raspi-Config default overclock settings for the Raspberry Pi 2 are as follows:
# Failed testing - Raspi-Config 'Pi2' values

arm_freq=1000

core_freq=500

sdram_freq=500

over_voltage=2
Rather than using the Raspi-Config tool’s overclock option to select the only available ‘Pi2’ option, it is possible to directly edit the config.txt file to create or adjust the overclock settings for the CPU, GPU and RAM individually, and to set a huge range of values for each.
After much experimentation with different settings (some of which are detailed at the end of this post), the following were settled upon, having passed a range of reliability (and real world) tests over a considerable period:
# Tested Stable - Live Running Values

arm_freq=1050

core_freq=525

sdram_freq=450

over_voltage=3
Interestingly the CPU speed (arm_freq) has actually been increased over the raspi-config ‘Pi2’ settings, as has the GPU (core_freq), whilst the RAM (sdram_freq) was necessarily left as per the system default. The overall power (over_voltage) has been increased by a further 0.025v.
Overall the final values compared with a stock Pi 2 are:
- CPU speed: increased by 150 Mhz, rising from 900 MHz to 1050 Mhz
- GPU speed: more than doubled from 250 Mhz to 525 Mhz
- RAM speed: remains unchanged at 450 Mhz
- Overall voltage: increased by 0.075v, from 1.2v to 1.275v
Editing Overclock Settings Within the Config.txt File
File location: /boot/config.txt
To update the config.txt file, use a text editor such as the in-built Nano. To make and save changes, issue:
sudo nano config.txt.
Note: the command as shown in the image will open the file in a read-only state if the logged-in user does not have administrator (super user) privileges.
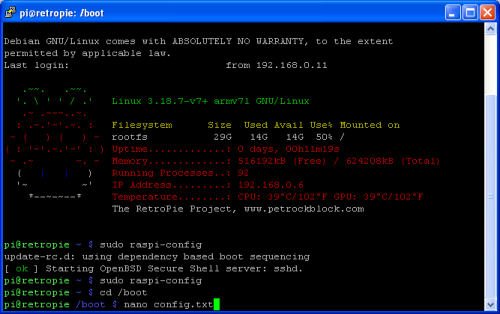
The necessary configuration key/value pairs will only exist in the (rather lengthy) config.txt file if the system has previously been set to use overclocking, either via Raspi-Config, or through manual editing of the config file. If the entries are not present, they can simply be added.
Note: ensure that the entries are not preceded by a hash symbol (‘#’) as these denote comments, which will be ignored.
Use Control + ‘X’ to leave the editor; this will prompt a warning regarding saving changes – press ‘Y’ to commit updates to the filesystem.
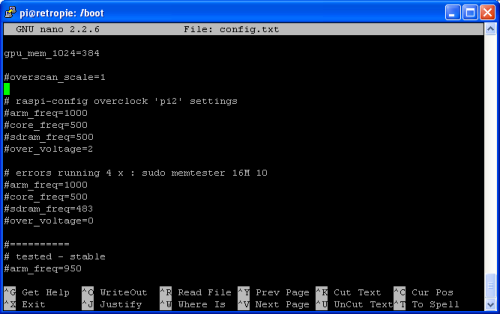
Some basic guides to using the Nano text editor which may be helpful:
The Nano Text Editor
Nano/Basics Guide – Gentoo Wiki
Whilst there are over twenty individual settings which affect the overclocking of various components, the three that are of fundamental importance are as follows:
arm_freq: ARM (main CPU) processor frequency (MHz)
core_freq: GPU (Graphical Processing Unit) frequency (MHz)
sdram_freq: SDRAM (main memory) frequency (MHz)
One option to avoid, if you value your warranty or the lifespan of the Pi, is force_turbo. This option prevents dynamic run-time control of the system overclocking (which resumes standard settings if the system reaches 85 degrees Celsius).
The faster electrical components work, the more energy they require. The default voltage supplied is 1.2v; in general it is necessary to increase this as overclocking is applied. This is somewhat a balancing act – trying to supply just enough power for stability, without providing too much (which increases heat in the system and as such is bad for component lifespan)
over_voltage: increase or decrease the default voltage in 0.025v steps (specified as integer values, e.g. ‘3’ equals increase of 0.075v
Help! What To Do If The Pi No Longer Boots After Applying Overclock Changes
Depending on the values you set for the overclock speeds of the various components of the Pi’s hardware the device may fail to boot. In this case you there are a couple of options to recover the system:
- 1. Extract the MicroSD card, and use another machine (PC, Mac, Linux box, etc.) to edit the
config.txtfile (which resides in a FAT32 partition rather than the standard Linux file system area). - 2. The simplest option, which should always work assuming you have a keyboard connected: hold down the shift key whilst booting the system, which disables the overclock settings temporarily. You can now either use Raspi-config to select different overclock settings, or edit the
config.txtfile directly from the command line or via a remote SSH session.
The three related posts in this series focus on stress and stability testing. This is critically important as simply having the machine successfully boot is not a guarantee that the Pi will be stable under load. Failures due to overclocking can cause a wide range of subtle, and not so subtle, problems.
Stress and Stability Testing
In part two of this guide I cover stability testing of the overclocked Raspberry Pi, and CPU testing with mprime.
Part three covers stability testing of the overclocked Raspberry Pi, and RAM testing with Memtester.
Finally, part four of this guide concludes with a look at testing the SD storage using a Stability Test Script.
Tested Overclock Values – Failures and Successes
Overclock setting values extracted from Config.txt – all values except tested, working, entries are commented (initial ‘#’ character)
Test values were left in the config file to progressively narrow down a stable set of values.
Note: Overclock values have been relocated to a separate page:
Tested overclock values
A Labour of Love
Retro Resolution is entirely a labour of love. Please consider offering a donation if the information here has helped illuminate, enlighten, or otherwise assisted you!

Related Posts
- Links: Raspberry Pi and Gaming Emulation via RetroPie
- Don’t Fear The Command Line: Raspbian Linux Shell Commands and Tools – Part 1: Just the Basics
- Navigating the Raspberry Pi’s File System. Raspbian Linux Shell Commands and Tools – Part 2
Overclocking and Stability Testing the Raspberry Pi
- Part 2: Stress testing the CPU with mprime
- Part 3: Stress testing the RAM with Memtester
- Part 4: Stress testing the SD card storage with the Stability Test Script
About
Disclaimers
Privacy Policy
Terms and Conditions
© Retro Resolution
One thought on “Overclocking and Stability Testing the Raspberry Pi 2 – Part 1: Overclocking in Depth”