The extremely inexpensive Raspberry Pi allows faithful emulation of Atari ST and STe machines, splendidly affirming Atari’s mid-1980’s slogan Power Without the Price; in this guide I cover the configuration and utilisation of RetroPie‘s Hatari emulator.
![]()
I have a great fondness for Atari‘s computers, having owned a 130XE before moving on to the 16-bit ST range; it was many years later that I discovered that the latter machines were largely the product of Commodore engineers, the true technological successor to the Atari 8-bit range being, through quirks of business and fate, the Amiga.
My stalwart 520STfm machine dutifully provided years of service in a broad array of roles, including: code development, primarily using Action! and GFA Basic; word-processing in 1st Word Plus; running inspiring demoscene productions; driving MIDI keyboards; and of course the inevitable core function as a gaming platform.
This guide has been written primarily for the Raspberry Pi implementation of Hatari, which for RetroPie 3.6 is the latest version, 1.9.0, released in September 2015. As the emulator has been compiled from the original source code virtually all of the following information will be equally applicable to the Windows, OSX, and other Linux platforms besides Raspbian.
Topics Covered
- Emulation Without a Safety Net
- A Note on Emulation Legality
- Installing the RetroPie Hatari Emulator
- Selecting RetroPie’s Hatari Emulator Version
- Initial Emulator Configuration
- Saving the Configuration
- Atari ST / STe Specific Keys
- Hatari Keyboard Shortcuts
- A Note on Using a Mouse
- External Links
- Related Posts
Emulation Without a Safety Net
RetroPie‘s emulators for classic computer systems do not implement the common functionality found in the RetroArch Core systems. For further details, please see the What is RetroArch? section in the post RetroPie system overview – software and hardware components, and the related article: RetroPie Emulation: RetroArch, Libretro, and the Power of the Options Menu
Hatari implements a native options menu which is accessed via a preset function key, F12, and navigated only via mouse (thus requiring both a USB or Bluetooth keyboard, and a mouse).
A Note on Emulation Legality
As with all emulators, to be used in a legal manner the machine’s operating system / BIOS files, which are copyrighted material, must be owned by the user – this generally means that the user must posses the original hardware, and preferably extract the data from the BIOS themselves. Similarly, the user must personally own all software executed upon the emulated system.


For further information please see: Emulation legality – an overview, and the related article Emulation legality and extracting images from your own game cartridges.
Installing the RetroPie Hatari Emulator
Following revisions to RetroPie‘s setup script in June 2016, it is possible that your installation does not have Hatari installed as standard. If this is the case, please see the ‘Installing Optional Packages (Emulators and More)’ section of my RetroPie Manual Installation Guide, including the Version 4 Setup Script Revised Menu Structure.
Selecting RetroPie’s Hatari Emulator Version
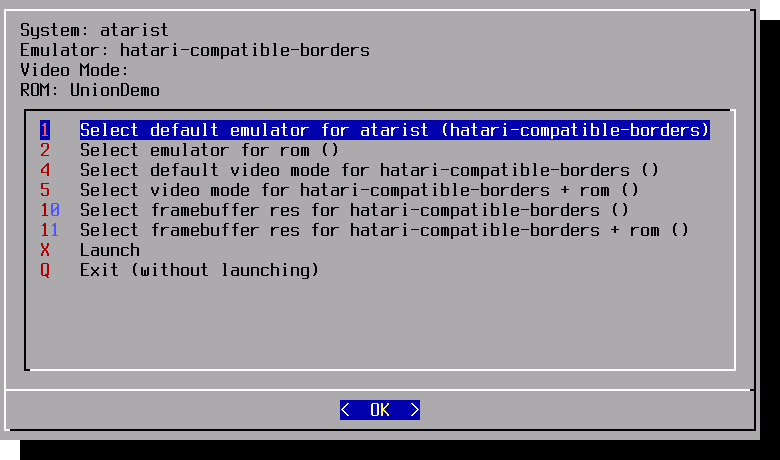
Whilst Hatari has not been implemented as a RetroArch core, RetroPie (since version 3) still provides some external configuration of the emulator. By pressing a controller key as an Atari ST rom is loaded, the RetroPie Runcommand Menu* can be accessed; four versions of Hatari can be choosen, either as the Default Emulator, or the emulator for a specific rom (game, demo, application, etc).
* Pressing any key on the keyboard, or the button mapped as A on a controller, opens the Runcommand Launch Menu. For details see the RetroPie wiki Runcommand page.
I have mainly utilised Hatari for running Atari ST and STe demoscene productions. In general these tour de force programming demonstrations push the hardware harder than any other application, and thus area a good test of an emulator’s capabilities. I found that the hatari-compatible-borders or hatari-compatible configurations provided maximum software compatibility; a great many of the demos I attempted to run would not load at all with the hatari-fast-borders or hatari-fast emulator variants.

The Atari ST, in common with many computers of the era, generated an image with large borders in order to compensate for overscan issues that were a side-effect of the contemporary CRT display technology. When using the emulator for games and productivity software, these borders can generally be completely removed by selecting the hatari-compatible configuration.
As many of the demoscene productions utilise clever programming to output images in the usually empty border area, I tend to run the hatari-compatible-borders emulator setup. The emulator allows the size of the border area to be set by the user, so an acceptable balance can generally be found.
For those interested in the seeing what an ST is truly capable of, I thoroughly recommend StSurvivor‘s democyclopedia: The Encyclopaedia of Atari ST Demos.


Initial Emulator Configuration
The Hatari emulator’s Main Menu is accessed by pressing F12. Depending upon the emulated Atari’s resolution at the time, the menu may be rendered either in low or high resolution:


Hatari‘s menu contains numerous sub-menus, however only a few actually require configuration to produce a workable system. The others optionally allow for manipulation of controllers, appearance and so forth.
In the following section I’ll show the settings required for both Atari ST and Atari STe emulation. I have not tried Hatari‘s TT or Falcon emulation at time of writing.
System Menu

The settings in the System Options menu and the ROM Menu are complimentary, effectively working as a unit – it is important that the entries made across both menus work logically together.
– Selecting Machine Type
- Atari ST: ST
- Atari STe: STE
– Settings Common to Atari ST and STe
- CPU Type: 68000
- CPU Clock: 8 Mhz
- Falcon DSP: none
- CPU & System Parameters
- [x] Boot faster by patching TOS & sysvars:
- [x] Prefetch mode, slower
– Settings for Atari STe
- CPU & System Parameters
- [x] Blitter Emulation
In practice the Blitter option appears to have no effect when the Machine Type is set to STe, presumably as all STe models contain a Blitter chip.
ROM Menu

The ROM Menu is used to set the location of the Atari’s BIOS file, and should not be confused with RetroPie‘s nomenclature under which a ROM refers to a game or other programme image.
– A Note on the Atari ST BIOS
On ST machines the BIOS is known as the TOS, standing either for The Operating System, or Tramiel Operating System, depending on which story you adhere to.
Hatari does not come with official TOS images, which are, as mentioned previously, copyrighted material. As noted on the official Hatari development site tools such as TOSDUMP.PRG and WINX exist which enable extraction of an image from your own Atari ST machine.
A synthetic TOS image known as EmuTOS ships with the emulator, and is used in the absence of any other BIOS being specified, however there are compatibility issues with various software titles.
– Where Should the TOS Images Files be Placed?
As advised by the RetroPie wiki you should place your Atari ST/STE/TT/Falcon ROMS in /home/pi/RetroPie/roms/atarist.
This location is somewhat unusual as most BIOS files for RetroPie are placed in the /home/pi/RetroPie/BIOS directory, however in practice the images can reside anywhere on the file system. The actual file name of a given TOS image does not appear to affect operation of the emulator, as long as the image itself is intact and of the specified version.
Set the TOS Image by using the Browse button in the TOS Setup section to locate the appropriate file:
- Atari ST: Tos102.img
- Atari STe: TOS v1.62 (1990)(Atari Corp)(STE)(UK)
Regarding the version of TOS file selected for the Atari STe, experienced ST luminary AtariCrypt notes that he uses TOS v1.62 in his post on the Basics of Hatari. I have also successfully used TOS 2.06 (UK) when testing the STe-only Corporation Demo.
Memory Menu

The Memory Menu serves two distinct purposes, allowing the size of the emulated machine’s RAM to be set, and facilitating the loading and saving of system state snapshots.
– Memory Setup Options
The Memory Setup section allows configuration of the emulated machine’s RAM size. A range of values are available, however for most purposes the 1 MiB (megabyte) option is optimal.
According to a somewhat older Hatari setup guide, if you are planing to make use of the hard-disk emulation feature:
Chose 4 MB, then you’ll have enough memory to run stuff from harddrive. A couple old ST-demos will choke on 4 MB due to a lousy memory-check routine, lower to 2 MB in those cases.
– Memory Save State
The Memory State Save section allows the entire memory of the emulated Atari to be written to a local file (which, given the ram constraints of the Atari systems, is very small by contemporary standards). Use the Save button to browse to and select, or create, a file with a .sav extension.
Use the Restore button to select a file to load, restoring the system to the exact state it was in when saved.
The facility operates in a similar manner to the save-state feature provided in RetroArch core emulators, as explained in the post PlayStation Emulation on the Pi: Enhancing the Experience with the Options Menu – Part One: Basic Features and Save States, with the added bonus that descriptive filenames can be used.
– Direct Loading Save States from Emulation Station
Thanks to GrethTom on the retropie.org.uk forum for explaining how to launch Hatari save-state files directly from Emulation Station:
Firstly I updated the
es_systems.cfgto add.savas a compatible format for AtariST
For guidance on adding file extensions to Emulation Station, please see the later entry: A Note Regarding Supported File Formats.
Providing that your emulator save-state files are saved to the main ROM location, they should now appear in the Emulation Station list alongside other Atari ST images.
Next the list of available Hatari emulator configurations available when launching an image from Emulation Station is expanded:
Edit the emulators.cfg file using a text editor such as nano; a couple of basic guides to using this tool which may be helpful are:
The Nano Text Editor
Nano/Basics Guide – Gentoo Wiki
At the command line, type:
sudo nano /opt/retropie/configs/atarist/emulators.cfg
Add the following entry:
hatari-memstate="/opt/retropie/emulators/hatari/bin/hatari --zoom 1 --compatible 0 --timer-d 1 -w --borders 0 --memstate %ROM%"
I also added a version to launch Hatari in compatible mode with borders, for use mainly with demoscene productions:
hatari-compatible-borders-memstate="/opt/retropie/emulators/hatari/bin/hatari --zoom 1 --compatible 1 --timer-d 0 -w --borders 1 --memstate %ROM%"
When you launch a .sav memory state [from Emulation Station] press the
Abutton on launch [to display the Runcommand Menu] and make sure it is using thishatari-memstate[orhatari-compatible-borders-memstate] as default for the particular [save-state files] you need
Atari Screen Menu

The Atari Screen Menu controls the actual emulation of the Atari system’s display (in contrast to the Hatari Screen Menu, which provides status overlays, screen grabs, and filtering effects).
– Atari Monitor Options
Show Borders: checked
As noted previously, displaying the screen borders is a good idea when running demoscene productions. For most games and productivity software the border area is unused, (with exceptions such as Kick Off 2).
If Show Borders is enabled, the border size can be controlled from options in the Hatari Screen Menu.
– Extended VDI Screen Options
Options in the Extended VDI Screen Options section can be left at their default values:
Use extended VDI screen: unchecked
Size: 640 x 480
Colours: 16
Hatari Screen Menu

Hatari‘s screen menu contains three separate sections, controlling the following display functions:
– Hatari Screen Options
Indicators controls the display of disk access activity and system configuration information:
- None
– removes all disk activity and machine configuration information -
Drive led
– displays a simple green lozenge icon in the top-right of the display to indicate disk activity -
Statusbar
– provides details on read/write access and current disk track and sector location, along with machine summary details (CPU speed, RAM, TOS version, Display, and Input)

Max Zoomed Win – effectively allows control over the size of the border surrounding the main display area. This option only takes effect if Show Borders is checked in the Atari Screen Menu.
The Fullscreen option is intended for use when Hatari is run within a desktop window, and thus is not utilised under RetroPie.
– Screen Capture Options
After clicking the Record AVI button, the following error message is likely to be displayed:
AVI Recording : failed to open file
To remedy the problem we need to edit RetroPie‘s Atari ST emulator configuration file, using the same approach as detailed in the previous section: Direct Loading Save States From Emulation Station.
A few additional arguments need to be passed to set the path and name for the avi file, the video codec, and compression level (if applicable). You can update the existing commands which launch the Hatari emulator, and / or create additional new entries.
– Selecting a Video Codec
Two codecs are available, storing the video using either uncompressed bmp images for each frame, or compressed, lossless, png. The former option consumes considerable disk space; the latter allows the user to select from 10 levels of compression; the higher the level, the more CPU time is required to process the video, which can lead to a noticable slowdown of the emulator during recording.
– Updating the Emulator Config Entries
To edit the config file using the in-built nano text editor, from a terminal window type:
sudo nano /opt/retropie/configs/atarist/emulators.cfg
The following code adds two new entries, one to use the bmp codec, and another for the png codec, which also specifies a compression level of 3. Both commands set the path for the video output file to /home/pi/RetroPie/roms/atarist/AVI/; the filename is slightly different for each variant.
Please note that a new directory, AVI, has been created within the /home/pi/RetroPie/roms/atarist folder. You may set whichever valid path you choose.
Place the new code at the bottom of the configuration file:
hatari-compatible-avi-bmp="/opt/retropie/emulators/hatari/bin/hatari --zoom 1 --compatible 1 --timer-d 0 -w --borders 1 --avi-file /home/pi/RetroPie/roms/atarist/AVI/hatari_bmp.avi --avi-vcodec bmp %ROM%"
hatari-compatible-avi-png="/opt/retropie/emulators/hatari/bin/hatari --zoom 1 --compatible 1 --timer-d 0 -w --borders 1 --avi-file /home/pi/RetroPie/roms/atarist/AVI/hatari_png.avi --avi-vcodec png --png-level 3 %ROM%"
If updating one or more of the existing commands, add the following entries before the %ROM% at the end of the line:
For the bmp codec:
--avi-file /home/pi/RetroPie/roms/atarist/AVI/hatari_bmp.avi --avi-vcodec bmp
For the png codec:
--avi-file /home/pi/RetroPie/roms/atarist/AVI/hatari_png.avi --avi-vcodec png --png-level 3
If new entries have been created, either set one as the default emulator at the RetroPie Runcommand Menu, or specificy it on a per-rom basis.
– Points to Consider When Recording Footage
There is no method to specify a filename from within the Hatari emulator menu itself; when recording multiple videos the emulator will overwrite the file. One option to workaround this limitation is to use a remote ssh session to connect to the Raspberry Pi, and to rename the .avi after each recording is completed.
Given the load which simultaneously emulating an Atari ST and recording video puts upon the Raspberry Pi, using a fast Micro SD card (class 10), and overclocking the machine is recommended. For overclocking guides specific to the Pi 2 and Pi 3, please see the Related Posts section.
Optionally, check the Crop statusbar option in the Hatari Screen menu to remove the Status Bar from the video recording, if it is currently being displayed.
– The Screenshot Button
A note regarding the Screenshot button. This takes a single frame grab, however it is not possible to specificy the format, path, or filename; the Hatari documentation states only that the “current working directory” is used.
– SDL2 Options
Select Use Linear Scaling to apply a bilinear filtering effect, making the emulated display slightly fuzzier, should you find the pixels too sharp on an LCD display.
The Use VSync option is generally used to synchronise updates to the video buffer with the physical display, preventing tearing effects. In practice I’ve not needed to utilise the option, and do not know for certain if it actually has an effect in this implementation of Hatari.
For those interested, SDL stands for Simple DirectMedia Layer, and is described on the project’s homepage as:
…a cross-platform development library designed to provide low level access to audio, keyboard, mouse, joystick, and graphics hardware via OpenGL and Direct3D
Joystick Menu

Whilst Hatari does not utilise the RetroArch platform, it is able to detect USB controller adaptors, which can be selected via the Use Real Joystick option. In the above screen grab the Wise Group, Ltd entry is the system name of my 3 in 1 Joy Box USB adaptor which supports Saturn, PlayStation, and Dreamcast controllers.
The specific configuration mapping is unclear, and is listed on the RetroPie wiki as hardcoded, although when using a PlayStation Dualshock controller with analog mode switched off the D-pad is mapped to the main stick directions; as the ST comes from an era of single-button joysticks, the Triangle button mapped to the single ST fire button.
The keyboard can be utilised in place of a joystick by selecting Use Keyboard, and optionally using the Define Keys option. The default keyboard-to-joystick mappings, from the RetroPie wiki, are:
Up: up
Down: down
Left: left
Right: right
Fire: RCTRL [Right Control]
Please note: it is necessary to map the physical controller, or keyboard, to ST Joystick 0, rather than the default ST Joystick 1.
Keyboard Menu

For most purposes the Keyboard Setup values can be left at the defaults of:
Keyboard mapping: symbolic
Disable key repeat in fast forward mode: unchecked
Sound Menu

For most purposes the SOUND section values can be left at the defaults of:
Enabled: checked
Synchronised: unchecked
Playback quality: 44100 Hz
YM voices mixing: ST table
According to Ubuntu’s manpage for Hatari;
To prevent extra sound artifacts, the frequency should be selected so that it either matches evenly with the STE/TT/Falcon sound DMA (6258, 12517, 250033, 50066 Hz) or your sound card frequencies (11025, 22050, 44100 or 6000…48000 Hz)
Loading Game and Other Software images
Whilst Emulation Station allows the selection of a programme image to be loaded into the Hatari emulator, this automatically loads the configuration saved in the default hatari.cfg file. This is not ideal when switching between software designed for specific Atari machines (ST / STe), or different hardware configurations (floppy disk vs. hard disk, for example). It is also cumbersome to exit the emulator and return to the Emulation Station front-end simply to run another piece of software within the emulator.
A better approach is to make use of Hatari‘s Floppy Disk menu, and optionally load a system-specific configuration file, when loading different software images.
– The Floppy Disk Menu


Default floppy images directory – it is worth using this option to set the folder containing your ST game, demo, and other image files. This controls the default location of the file browser displayed when selecting files for the Drive A and Drive B options. Following the RetroPie convention, this location should be: /home/pi/RetroPie/roms/atarist
Separate images can be assigned to the emulated floppy Drive A and Drive B. If loading images into both drives, the Auto Insert B option may be useful (for example when running Defender of the Crown, and other dual-disk Cinemaware titles).
Hatari supports loading of files within zip archives; the file browser will display the content of the archive for a specific file to be selected. If the archive contains a single file, simply selecting the .zip file itself is sufficient.
Once a file has been assigned to Drive A, return to the Hatari main menu, then select Reset Machine, and click the OK button to reboot the emulated Atari to load the selected image.
Fast floppy access – for maximum compatibility it may be necessary to uncheck this option when running certain demos, and possibly some copy-protected games software.
Write Protection can generally be left Off, assuming you have backups of the image files containing the software being used by the emulator.
– A Note Regarding Supported File Formats
Hatari supports the following file formats, according to the RetroPie project site PetRockBlog:
.st .stx .img .rom .raw .ipf .ctr
Emulation Station‘s configuration file by default supports the above listed formats, and will display any file with these extensions. Neither list includes a very popular format (especially for demoscene productions) which the emulator does indeed support: .msa
Editing the Emulation Station config to include .msa so that it will appear in the front-end list of files is relatively simple. For guidance, please see the section “How can I change which file formats an emulator can use?” in the post Emulation Station – beneath the covers.
Hard Disks Menu

Despite best intentions to make this guide as comprehensive as possible, I have not yet explored Hatari‘s hard drive emulation capabilities. I endeavour to rectify this omission in the near future, if only to run the incredible 2015 Atari Ste demoscene production Sea of Colour.
Devices Setup Menu

The Devices Setup Menu contains options for Printer, RS232 port, and MIDI emulation facilities. In testing, each of these options generated errors, apparently due to similar file permission issues as afflict the screen grab facility.
Saving the Configuration

It is essential to save the configuration settings, otherwise all the configuration hard work will need to be repeated the next time the emulator is launched. Use the Save Config button to access the file browser.
It appears that the emulator automatically loads the settings from the hatari.cfg file stored in the /home/pi/.hatari hidden folder; your default setup should thus be saved to this configuration file.
You can save configuration files with different names (but the same .cfg extension), for example with specific settings for the Atari STe, for hard-disk setups etc. These can be loaded as required via the Load Config option from the main menu.
Atari ST / STe Specific Keys
Regarding the Atari ST keyboard, the majority of keys are directly mapped between the USB / Bluetooth keyboard connected to the Raspberry Pi and the emulated Atari ST / STe, however there are a four which have indirect mappings:

| Atari ST Keyboard | PC Keyboard |
|---|---|
Control |
Left Ctrl |
Alternate |
Alt |
Help |
Page Up |
Undo |
Page Down |
Hatari Keyboard Shortcuts
AltGR and q – Quit Hatari:
Exit the emulator; a confirmation dialog will be displayed.
AltGR and c – Cold Reset:
Equivalent of power-cycling the emulated Atari with the power switch.
AltGR and r – Warm Reset:
Emulating the Atari ST warm reset is handy especially when running demoscene productions, many of which have hidden screens accessible only when the reset button is pressed:


AltGR and k – Save snapshot:
Save memory snapshot. The last saved snapshot file will be used.
AltGR and l – Load snapshot:
Load memory snapshot. The last loaded snapshot file will be used.
Pause/Break – Pause Emulator
Note: this is distinct from AltGR and Pause/Break, which launches Hatari‘s debugger.
For full details, please see the Ubuntu Linux Hatari manual.
A Note on Using a Mouse
Whilst there is a Joystick Menu, there is no mouse menu. Whilst any mouse which works under the Raspbian desktop appears to also work under Hatari, each one I have tried leaves a little to be desired regarding precision of movement; attempting to move the mouse in a straight line causes the ST mouse to trace a crooked approximation.
I have tried two wireless mice (Microsoft and Logitech), and one wired unit; all three use optical sensors, and all suffer the same affliction. I am speculating, but do not know, that the issue is due to relatively higher sampling rates and DPI of the modern units.
I do not believe this issue is due to Hatari itself, as the Raspbian Amiga emulator UAE4All exhibits the same problem. Notably the mouse movement within the Hatari menu itself is fine.
![]()
A Labour of Love
Retro Resolution is entirely a labour of love. Please consider offering a donation if the information here has helped illuminate, enlighten, or otherwise assisted you!

External Links
- Wikipedia: An extensive entry on demo productions: Demo (computer programming)
- StSurvivor’s Democyclopedia: The Encyclopaedia of Atari ST Demos
- AtariCrypt: Introduction to Hatari 1.9.0
- AtariCrypt: STfm Demoscene YouTube Channel
- AtariCrypt: STe Demoscene YouTube Channel
- Hatari Atari Software Compatibility List
Related Posts
- Links: Raspberry Pi and Gaming Emulation via RetroPie
- RetroPie system overview – software and hardware components
- Multipurpose Raspberry Pi: Installing a Media, Gaming, PC Replacement
- Overclocking and Stability Testing the Raspberry Pi 2 -Part 1: Overclocking
- Overclocking the Raspberry Pi 3: Thermal Limits and Optimising for Single vs Multicore Performance
About
Disclaimers
Privacy Policy
Terms and Conditions
© Retro Resolution

Superb articles in all. Well written too. Enjoying all your Atari ST posts! Thumb up from me 🙂
LikeLiked by 1 person
Thanks so much – comments such as this make all the effort worth while. Glad you’re enjoying the articles.
LikeLike
Thank you for this article. It sparked me to retry getting an old piece of home-written Atari TT code to run again. I’d tried this without success on various emulators (including older versions of Hatari), it kept crashing. Tried it on Hatari today and it ran without error, first on my Raspi3, then on my Mac!
Do you know if someone has ported Hatari 2.0.0 to the Pi yet?
LikeLike
That’s great, glad the article helped in some small way.
I must confess to having no knowledge of Hatari 2 – I’ll investigate…
LikeLike
Great article, thanks for posting.. I grew up using a 1040 STfm in my early teens, mostly for playing games and magazine programs.
Regarding the issues using a mouse within Hatari, I suspect it’s because the original ST mouse worked like a joystick, sending up/down/left/right/up-left/up-right/etc.. signals to the system. I don’t know the technical details of this, sorry.
LikeLike
Hi,
Many thanks for your comments. I’m very glad the article is still of use three years after I wrote it – most of my technical pieces are swiftly outdated.
Thanks also for the feedback regarding the operation of the ST mouse. I wonder if the Amiga had the same system, as the tracking problem is also present in WinUAE on the Pi (although it’s been a couple of years since I had that installed and configured).
All the best
RR
LikeLike